Site template
There are many resources out there for making your own website, teaching you the basics of HTML and CSS and JavaScript, and many also offer various kinds of templates to start from. For every person who wants to make a site, there's an "easy site template minimal coding knowledge needed" they can use. The problem with those is that while they do easily get you started, because you don't really need to know what you're doing, once you have the site running and start to learn what you're doing, they will always turn out to be pretty restrictive. The less a template tries to have to explain upfront, the harder it gets to change or expand your site down the line.
That's why I'm offering a template that needs me to explain a bunch of stuff upfront, so that your site will be easy to change or expand down the line.
Introduction
This website is made using Jekyll, which is a free open-source static site generator. A static site is a site of which the code doesn't change as the visitor interacts with it, which is basically any site that doesn't have a database attached. Jekyll is a program installed on your computer and needs no internet connection to run. It allows you to split your website into pieces of code that are often repeated across pages and pieces of code that are unique to each page, and Jekyll will combine the two according to your instructions into files that can then be uploaded to your hosting provider to form your site.
For example, the contents of the template.html file on my computer, which you're seeing on this page, are actually only the text of this page, without any of the sidebars, the header, or even the <html> tags that would identify it as a webpage. Instead I have a layout file, where I write all the code for the website layout once and mark where the text for individual pages should be inserted. I then mark which layout a page should be inserted into, and Jekyll will combine them into a full working page. If I want to change something about the way my site looks, I only need to change the layout file, and all my other pages using that layout will be changed to match.
Jekyll can also read files in a directory to make things like a list of blog posts or an image gallery, and read through designated data files and use that information when building a page. The menu of this site starts out as a list in a file called navigation.yml, I specify what HTML needs to go around each menu item in menu.html, and then the layout file has instructions to insert the menu code at a specific spot. The result is that I only have to write <a href="">menu item</a> and so on once, and whenever I decide to add a new page to the menu all I have to do is update navigation.yml and the rest will happen on its own. The same navigation file is read to generate the directory index pages like My Art, so I don't have to remember to update those after expanding the site either.
Jekyll is specialised for creating blogs and comes with features to automatically host your site through github pages, but it can be used for any kind of site on any webhost. My site is hosted on Neocities and uses a Jekyll plugin that is incompatible with github pages.
Stop being scared of code
A very important thing to realize about website coding is that most coding languages are just different ways to say the same things, especially if you're only looking at code in the context of making static websites. Once you get the hang of one language, every other language becomes easier to understand too. The exact things you have to type out are different, but the principles are the same.
The three languages used to write static websites are HTML, CSS, and JavaScript. HTML labels what things are, CSS decides how those things look, and JavaScript decides how those things behave. Jekyll expands upon this by also using YAML, SASS, and Liquid. The order I mentioned those in is deliberate: YAML is used to make lists that say what things are, SASS is literally just CSS with more features, and Liquid uses very similar concepts to basic JavaScript to indicate where and how page information should be combined. If you already know some HTML and CSS and maybe a bit of JavaScript, then you know how to use Jekyll.
Jekyll also lets you write your page contents in Markdown instead of HTML like it's a forum post, which might be easier for some people than HTML. Jekyll itself is written in Ruby, but you don't write any Ruby code when using Jekyll, only when you're trying to develop plugins for it.
Another important thing to understand about making websites is you are never the first person to try whatever you're trying to do. If you ever think to yourself "hm, I wonder how I could implement this feature," a quick internet search is pretty much guaranteed to spit out a stack exchange thread from like 2014 asking the same thing. Often you don't even have to go as far as stack exchange, W3Schools already has a page dedicated to it. Jekyll is open source and free, which means a lot of people use it and make features for it, which means there are a lot of help threads and options.
If you look into the source code for my site and the template, you'll find that a lot of the JavaScript used is honestly pretty jank, starting with the part where I haven't separated it into its own file and instead just put it directly onto the pages that use it. That's because I never properly taught myself JavaScript and it's all copied and slightly modified from stuff people who know more about JavaScript than me made. It's not as neat as it could and ideally should be, but for a website like this ran by a single person it works just fine. In the future where I'm better at JavaScript I'll update the template to be cleaner on that front too 
Coding isn't scary, because you don't have to do it alone :)
Setup
You can download the template version of this site here. This code is released under a "do whatever the fuck you want" license.
To use my site template, you first need to install Jekyll according to the instructions on the official website.
You also need to become at least a little bit comfortable with the command line, because Jekyll is used through line commands. On Windows it's called Command Prompt, with the executable cmd.exe. I have no idea how to access it or what commands to use for other operating systems, so if you're not also on Windows you'll have to look that up on your own.
When you open the command prompt, it will show you what directory it's currently looking at, for example C:\Users\Name. Type dir and hit enter to get a list of the contents of the current directory. You can use cd directory\subdirectory\etc (case-insensitive) to move into a lower directory, and use cd .. to move up a directory. Using cd without any further info will send you to the highest level of the current directory.
Unpack the template files in a logical location, and use the command line to navigate to the folder that contains the file called Gemfile. The Gemfile is a text file without extension which lists all the Ruby-based programs, plugins, and libraries used in the project in the folder. Then, type bundler install and hit enter. This will run the "bundler" program that was installed together with Ruby, which will automatically install all the stuff listed in the Gemfile, the most important one here being jekyll-paginate-v2. The paginate-v2 plugin is used to automatically split the blog into sub-pages instead of having it be a single miles long page with every single blog post, as well as create pages that filter blog posts per tag.
After that, in the same directory, run jekyll serve, open a browser, and go to localhost:4000. What you see should be something like this:
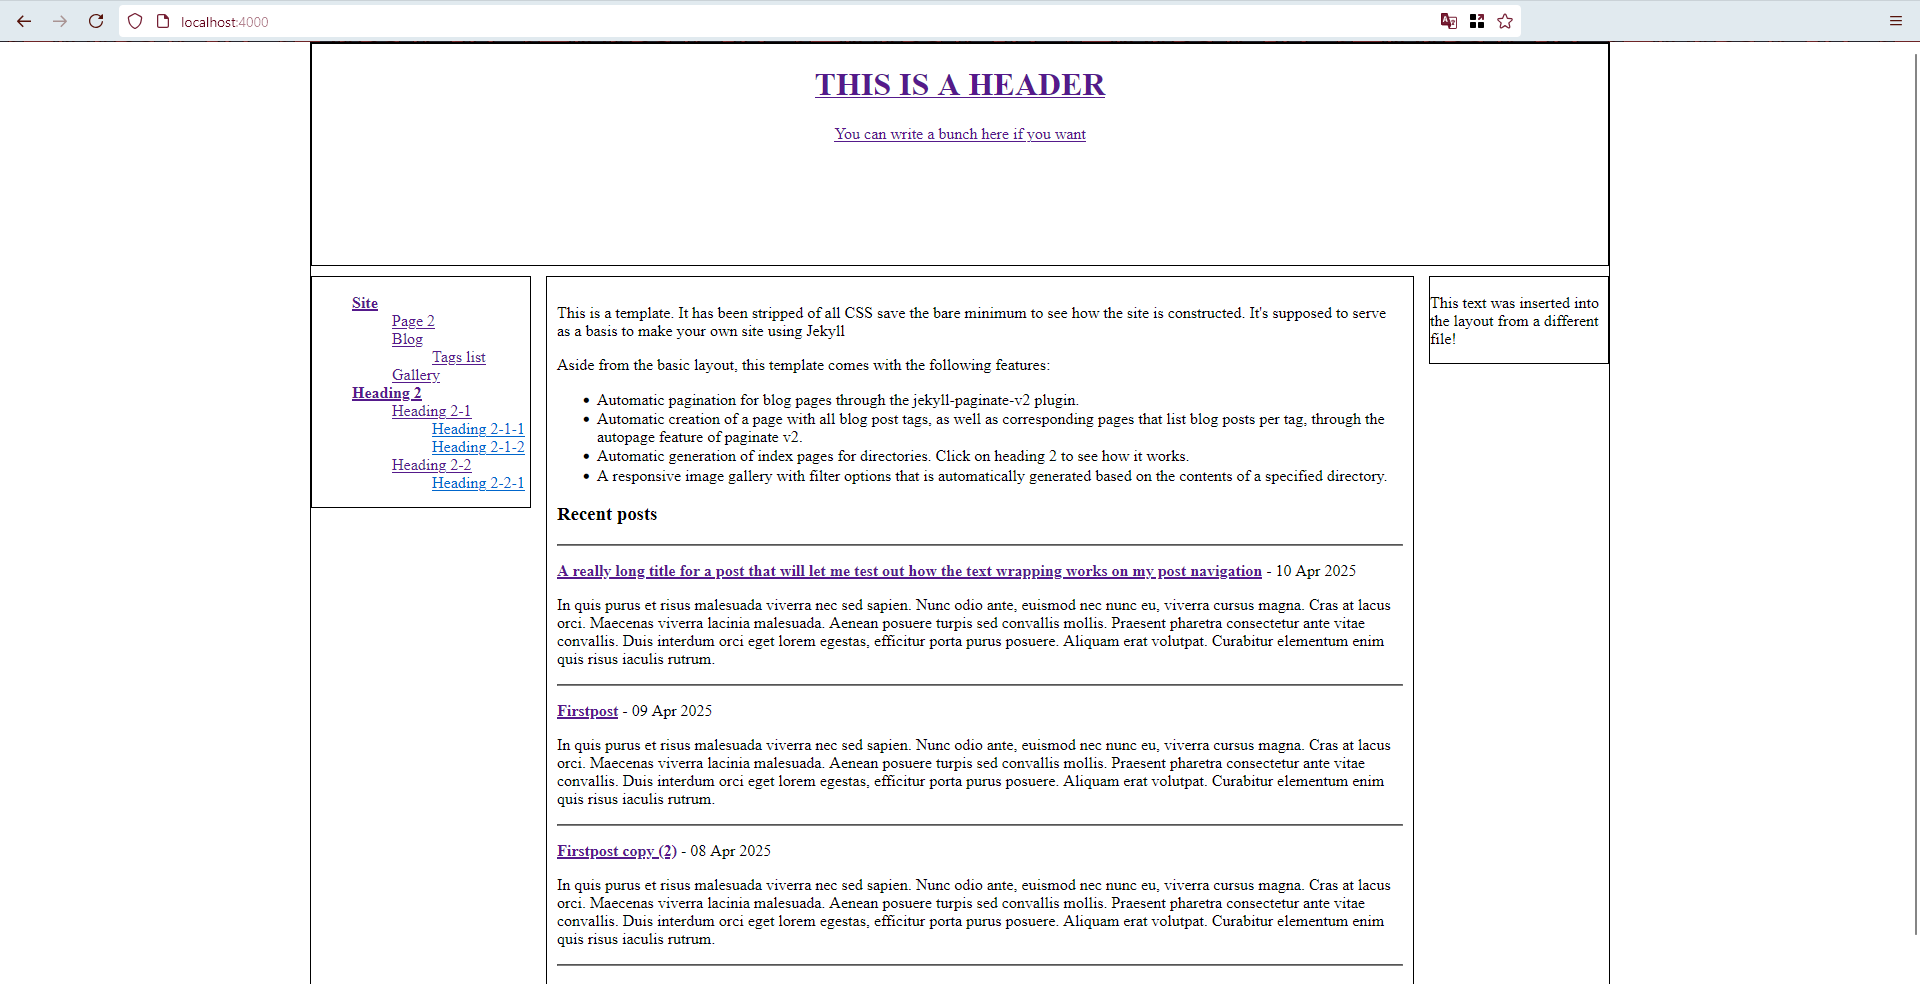
jekyll serve simulates what your site will be like once all the files are combined, which makes it easy to test whether what you're doing is any good or not. Click around a bunch, you'll find that everything works.
You'll likely get an error message saying "Layout 'autopage_collection' requested in index.html does not exist". "Collections" are a Jekyll feature not used in the template, but the paginate-v2 autopages feature can sort your content based on collections as well as tags, so it looks for a layout for the collection pages even if it won't be used.
Site components
All the files in the template are commentated, so open a few of the files in a code editor like notepad++ and see if you can make sense of how they relate. I also recommend reading through the step by step tutorial on the Jekyll site, which goes over all the basics of using Jekyll.
Jekyll has a number of default files and directories it uses to process your site.
_config.yml contains information on how Jekyll should approach your files. You can set default values for files, and configure any plugins you use. This file is read once upon starting the serve command and not updated while serve is running, so if you make any changes to the config file they won't be reflected until you stop and restart the serve process.
_data contains .yml files, which are lists of things that are referred to across the site. The template uses one to generate the menu, and I also use a different data file to generate the list of links on the right/bottom of my site.
_includes contains files with code that is inserted into other parts of the site. For example, whenever a list of posts is made on the site, I tell the page to insert post_list_item.html for every post, and blog pages have blogpaginate.html inserted at the bottom to create the navigation arrows. This way I can easily change how those elements are constructed without having to go over every page that uses them.
_layouts contains files that other files are inserted into. Layouts can be stacked, for example post.html also uses the default.html layout. The individual post contents are inserted into the post layout, then the combined post content and post layout are inserted into the default layout.
There is some overlap in use cases for includes and layouts. For example, I use _includes/index_page_list.html to hold the code used to generate index pages, but I could also put that code in a layout, and instead make the index pages empty save for the instruction to put the index page layout around it. Things like _includes/menu.html could also be inserted directly into the default layout, but by having it be an include I could at some point make a layout that is completely different for some pages, and still have the same list of menu links available to use in it. Each part will get combined into the same file in the end, so how you split them up is somewhat arbitrary and up to what makes most sense to you.
Because of a weird bug in paginate-v2, the page contents for the blog page need to be put in a template file instead of a page file, otherwise they'll get overwritten by the contents of the root index.html file if I refer to the list of posts on the homepage. Therefore, _layouts/blog_workaround.html serves as the contents for what would otherwise be /blog/index.html. While it's better not to use this construction normally, that's another example of the overlap between pages, layouts, and includes.
_posts is self explanatory, it's the folder that has all the posts for the blog. The date and title for the blog posts are automatically pulled from the filename.
_sass is basically the includes folder for your CSS files. The file that will be turned into your final .css file is assets/css/styles.scss, but all that one has is instructions to insert the various stylesheets from the _sass folder. You can totally just put a regular .css file in the assets folder and type all your CSS oldschool style, but like with layouts and includes, the idea is to let you split up your code across multiple files to keep things organised.
If you're familiar with CSS, you will note that the .scss files have some unusual nesting. .scss files are written in SASS, which as mentioned is essentially expanded CSS. It has a lot of features and it's worth checking out the documentation to see what those are, but the most straightforward and convenient one in my opinion is that it lets you nest your CSS code, so you can write something like:
#container{
 color: black;
 background-color: white;
 img{
  width: 100%;
 }
 a{
  font-weight:bold;
 }
}
and SASS will write it to the final .css file as:
#container{
 color: black;
 background-color: white;
}
#container img{
 width 100%;
}
#container a{
 font-weight:bold;
}
which makes it easy to group related bits of code together.
_site is where Jekyll outputs the finished site contents. Any folder or file that starts with an _underscore won't be in the final site directory, but you can refer to the contents of these hidden folders in your code for any processes that happen before the files are combined.
All the other directories are optional. assets and its subdirectories are what we call industry standard, but you don't Have to sort your files like that. If you're nasty you can just dump all your files in the root directory and create a horrid primordial soup of a website.
Building your site
The template contains the layout, data, and include files necessary to copy my site's basic structure. The CSS has the basic elements necessary to make the site easy to read and navigate on tablets and phones, and the menu includes some very basic keyboard navigation support. It includes the jekyll-feed and jekyll-seo plugins, which automatically generate an RSS feed of your blog posts and search engine optimisation information for your site respectively. Blog pagination and post tag filters are set up through the jekyll-paginate-v2 plugin, and I added links to navigate from one blog page or post to the next. In addition to the default Jekyll features and the plugins, the site template also includes the code I wrote to generate my index pages and the code for my interactive gallery. The gallery code is explained in detail inside the gallery/index.html file.
Of course, the template as provided looks like shit, because I stripped it of all but the bare minimun necessary CSS. The jekyll serve --livereload command is useful while editing your site, this automatically refreshes your simulated page every time any of the site files changes. Jekyll also helpfully points out the exact location of syntax errors while compiling the files, so you spend less time banging your head against the wall trying to find the one missing semicolon.
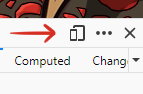
You can test how your site will look on different devices by opening inspect element and clicking the phone icon in the top right corner of the inspect window. Screenshot from Firefox, but bastard Chrome definitely has this too.
When building your site, try to keep basic accessibility in mind. If your site is going to be very text-heavy, make sure your text is clearly readable. If your links are only differentiated from regular text by their color, make sure to put a screenshot through a color blindness filter to check if they're visible to everyone. Use semantic HTML tags to help screen readers navigate your site, and if a bunch of your page's text is in images, add alt-text to them.
I am a big believer of learning by looking at and copying how people who understand it better are doing it. Whenever you see a site that does something you like, right-click it, select "view page source", and try to see if you understand how they did it.
The official Jekyll site is a little obtuse about listing all the default variables availalbe to use, so I like having this cheatsheet on hand.
Use jekyll build to generate the combined files once you think your site looks good to go, and then toss all the contents of the _site directory in your webhost. Make sure to set your site url in _config.yml.
Happy site building! 
Acknowledgements
Shoutout to my brother, senior developer at [COMPANY REDACTED], for informing me of things like "industry standard responsiveness cutoffs" and "keyboard navigation accessibility" and "they have semantic HTML tags now".
The JavaScript for the lightbox feature of the gallery was copied from Kaylee Rowena's portfolio template. The rest was cobbled together from W3Schools tutorials.
The site which first made me think having a site is cool so many years ago, and my continued go-to for an example by someone who knows what they're doing, is Cave of the Dragonflies. Thanks to the style switcher they have a lot of different CSS configurations you can inspect to jack a variety of styles.


